Branding
ℹ️ This is a guide for the Branding app within comm.land. Currently, this app is released in Alpha state and we will be adding more features.
Features coming soon include:
Child accounts will inherit Parent Account branding
Customize the desktop app, including icons, generic installer and downloads page
Migrating existing email templates from Monster UI into comm.land
Setting preferences for carriers and porting
Mobile app

Contents
Getting Started
If you have never used the Branding app before, you will be greeted with an option to use the Quickstart or simply enter the app.
If you select “Enter app” you will be placed in to the account whitelabeling page.

If you select “Quick Start”, you will be guided through 3 easy steps to get your account branded at the basic level.

First, you will need to enter your company name
Second, you can upload your company logo


Third, you can select your brand’s colors
Upon hitting enter app, you will land in the account whitelabeling section and your options from the Quick Start will be populated here.

Account Whitelabeling
This is the page where it all starts, if you followed the Quickstart, you will notice your info filled in for you.

If you opted to head straight to Account Whitelabeling, you will see that a Company Name is required for saving this page.

Fill in your
- Company Name (required)
- Company website
- Error reporting email address

Upload your company logo, this will affect the whole account
ℹ️ To white-label the UI for sub-accounts accessing comm.land via a web browser, you must configure browser settings and set up white-label DNS. If these two steps are not completed, you will need to manually set your logo under each account within the desktop app.

Set a primary color, this affects color across the app.

Choose to enable a custom message at the login screen for your users.

DNS Helper
How this works
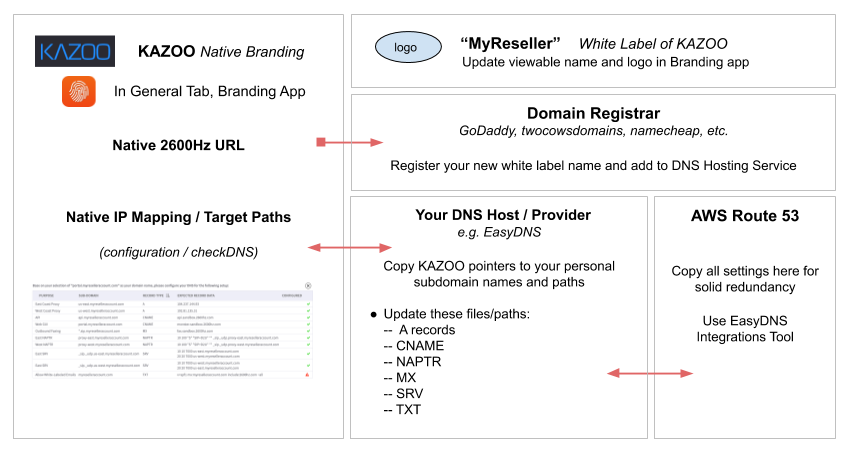
On its most basic level, DNS points human readable “names” to machine readable “data”. These are called DNS records. The most basic of which (an A record) points a “name” such as www.2600hz.com to an IP address 23.239.13.252. More advanced records can tell phones what port numbers to use, what servers they should prefer most and least and what protocols to use (SRV and NAPTR records). 2600Hz uses over a dozen of these records for its hosted Kazoo service, zswitch.net.
Resellers wishing to white-label zswitch must configure their domain names to include all these records. In this guide, we will show you how to point your domain to a supported DNS provider (easyDNS), configure your records, then replicate those records to another DNS provider (Amazon Route 53) for extremely reliable white-labeled DNS configuration.
Here’s an illustration:
💡 Disclaimer
If you are very familiar with DNS, you may be aware that there are other services and methods you could use to implement your DNS. This purpose of this document is to provide as easy a path as possible for those who are not as familiar with DNS to successfully white-label without complicating the process by explaining all possibilities. You are free to use the services and methods that suit you best.
Before you start
-
Purchase a new domain name specifically for your white-label branding via a Domain registrar, such as
-
Setup an account at https://easydns.com
ℹ️ Some DNS providers also offer domain registrar services. Using a DNS provider’s built in registrar service can seem like it simplifies nameserver settings, however it’s generally best to keep your registrar service with a major provider to ensure the security of your domain registration.
-
Make sure you have access to your login credentials for both services, as you will need to update them below.
White-label DNS configuration
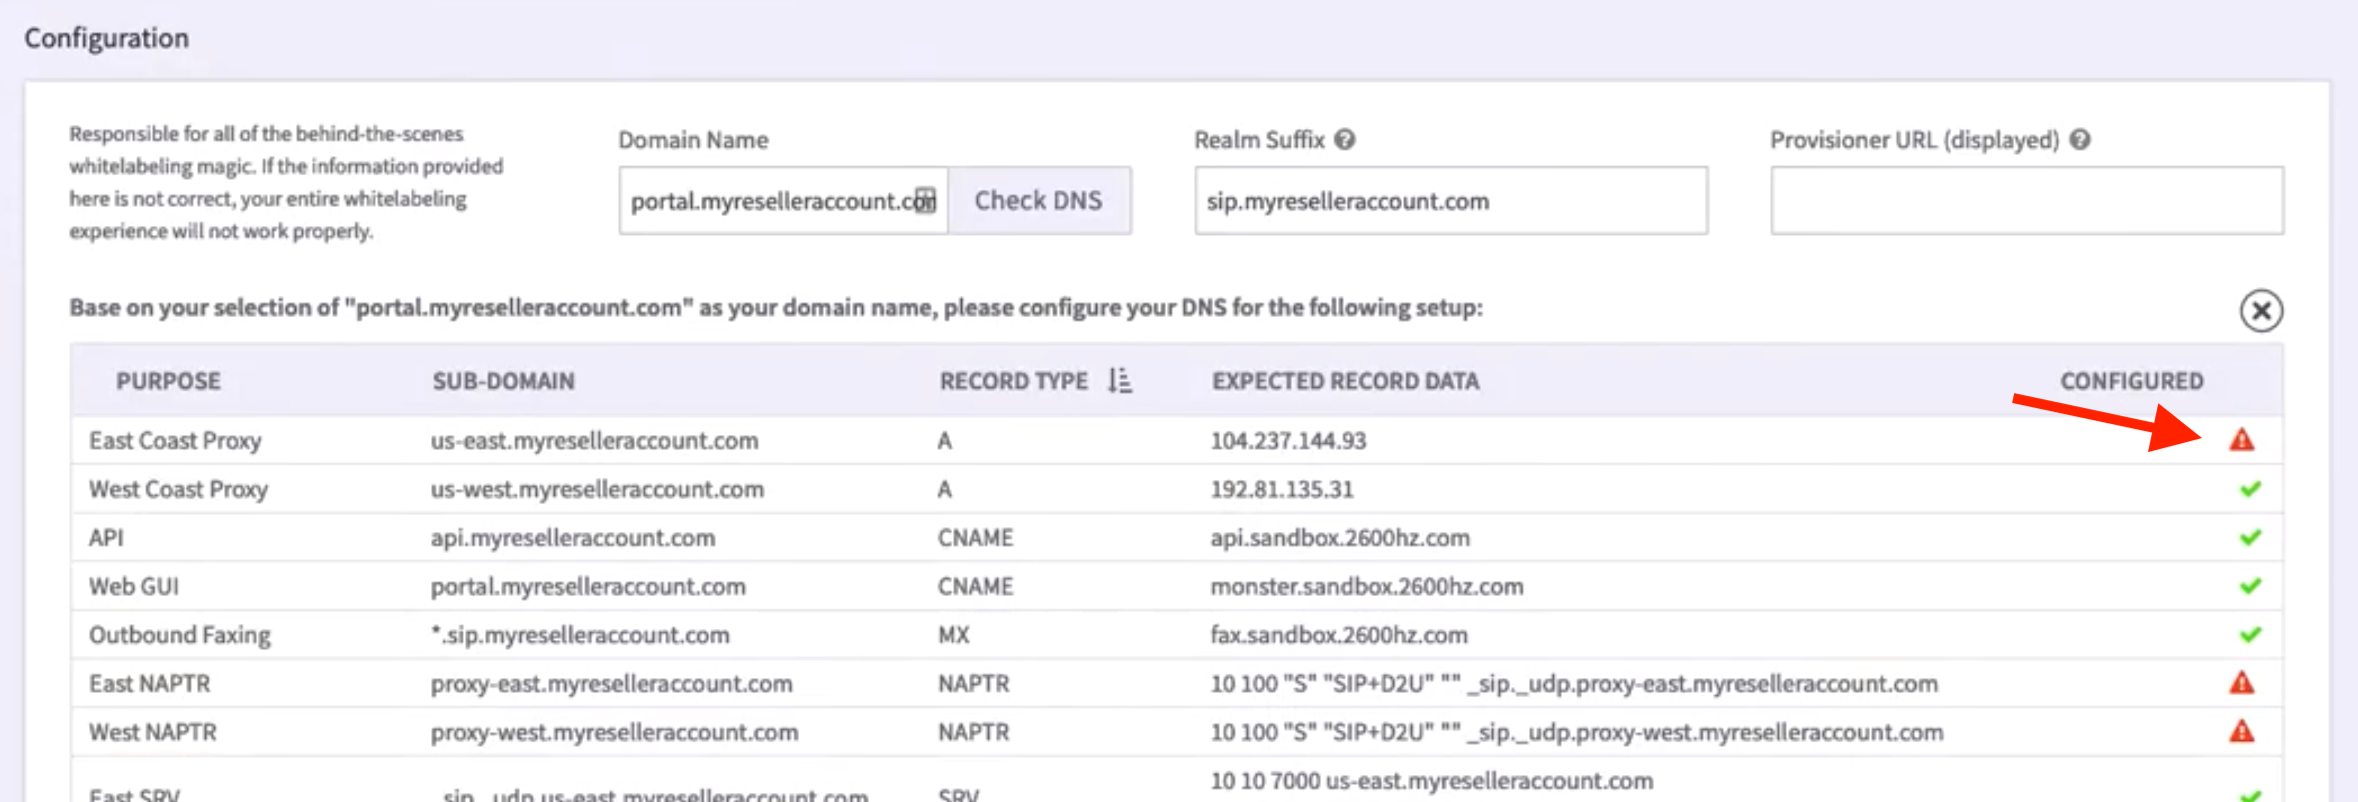
Initial configuration settings

- Enter your white label Domain name URL, using “portal” to prepend it.
- Enter the Realm Suffix using “sip” to prepend your URL name.The Realm Suffix will be used to generate the account realms of accounts created by your white label interface.
- Save Settings
Select the “Check DNS” button to the right of the Domain Name field

This displays a template of all domains records that need to be configured. You will want to keep a tab showing this open at all times, as you will be copying the information from this page to your DNS management system.

Set up your EasyDNS account and copy its nameservers to registrar
⚠️ This guide assumes the domain you are using will be used ONLY for white labeling Zswitch services. This step is dangerous if not.
-
Set up your account with easydns.com, selecting an appropriate plan for your expected volume
-
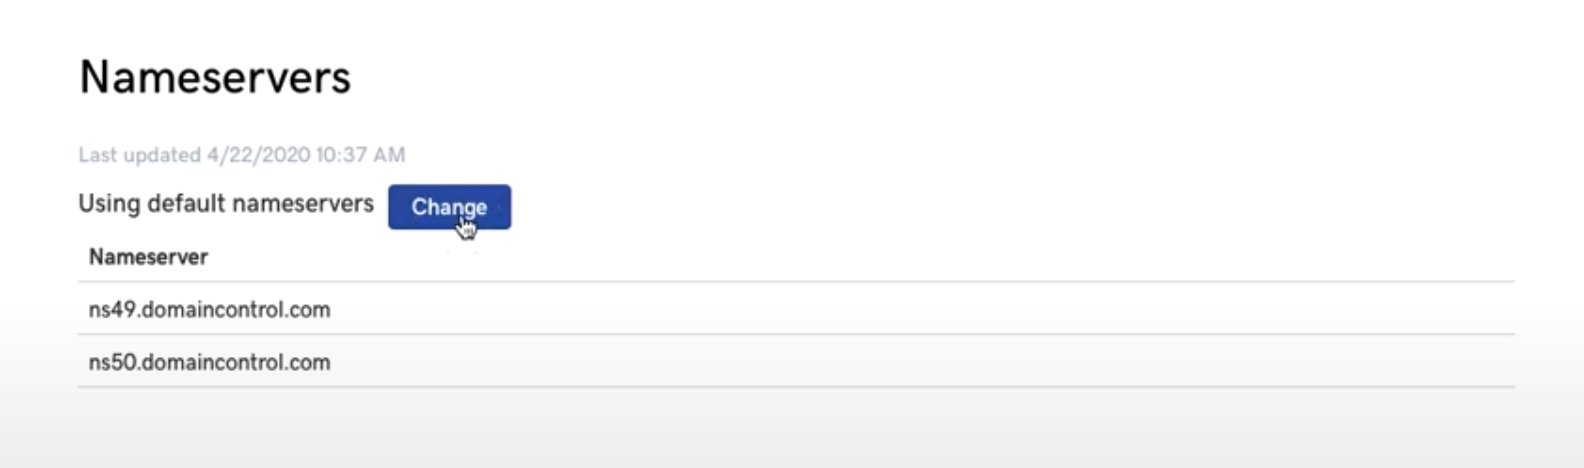
Get your new nameservers from easyDNS
-
Overwrite your nameservers on your registrar (godaddy or the like) account


Configure your DNS records
You may want to keep 2 windows open, 1 showing the Branding app in comm.land, the other showing the records entry window in your easyDNS software.

To configure the different kinds of records, you will step through these links and assign the records shown in the branding app to the fields shown.
Configure “A Records” “A Records” map host names to IP addresses. Click on the “A” option next to DNS Information in easyDNS (see above). Copy the data from the branding app to easyDNS as shown in the illustration below:
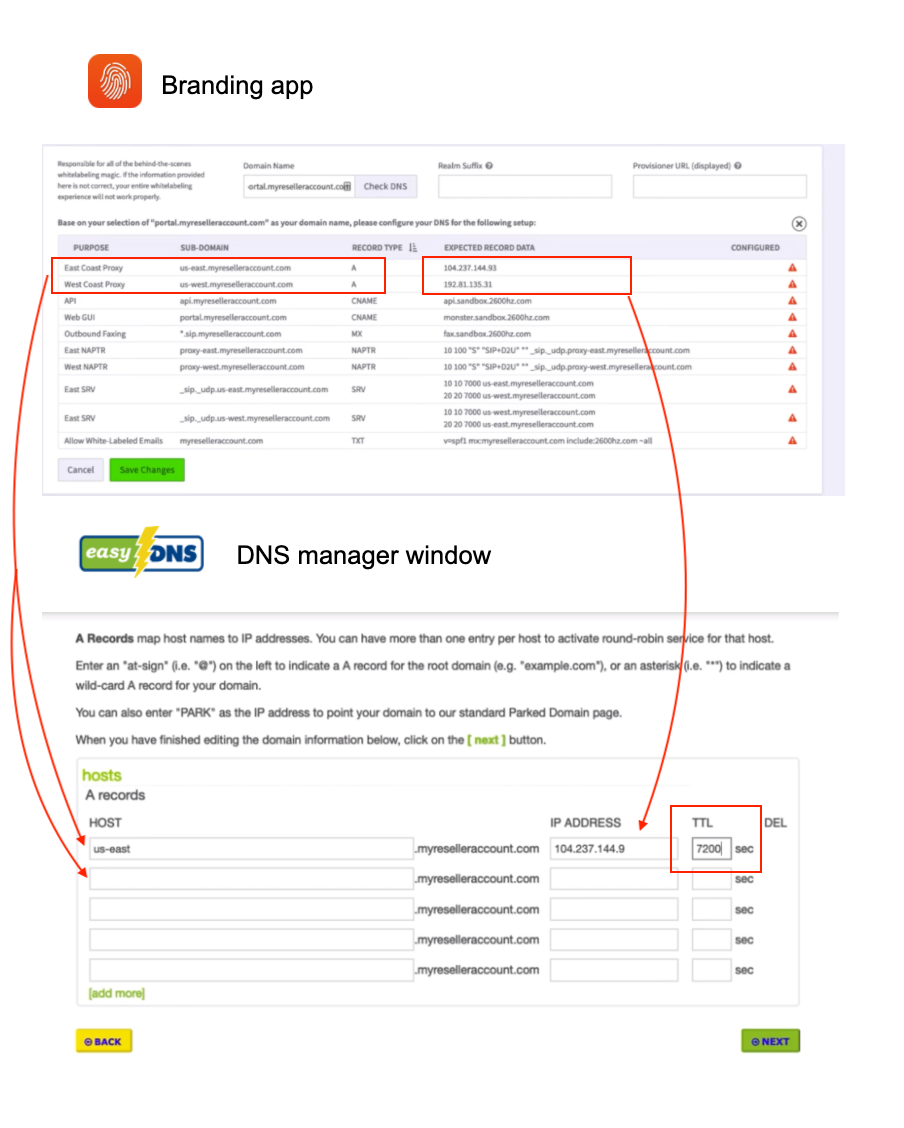
ℹ️ NOTES:
Only copy the “A record” types listings to this page.
“Expected Record Data” field in the Branding App = IP Address
Make sure the IP address starts flush against the field and does not show a tab or space to the left.
Enter a value for TTL A TTL is “Time To Live”. Set as seconds, it defines how long a DNS record should reside in a client’s DNS cache without being discarded or regenerated. A common value for TTL is 7200 seconds (2 hrs) and is our recommendation for all record entries. Most DNS providers charge based on record lookups. The higher this setting, the less lookups will hit your provider; also the higher your TTL is, the longer changes to your records will take to roll out.
Save / CONFIRM your changes!
Configure “CNAME Records” Once the “A records” are copied, move to the next page in easyDNS and copy the CNAME data from the Branding app. to the correct field in easyDNS.
CNAME records map host names to other host names, including hosts at other domains.
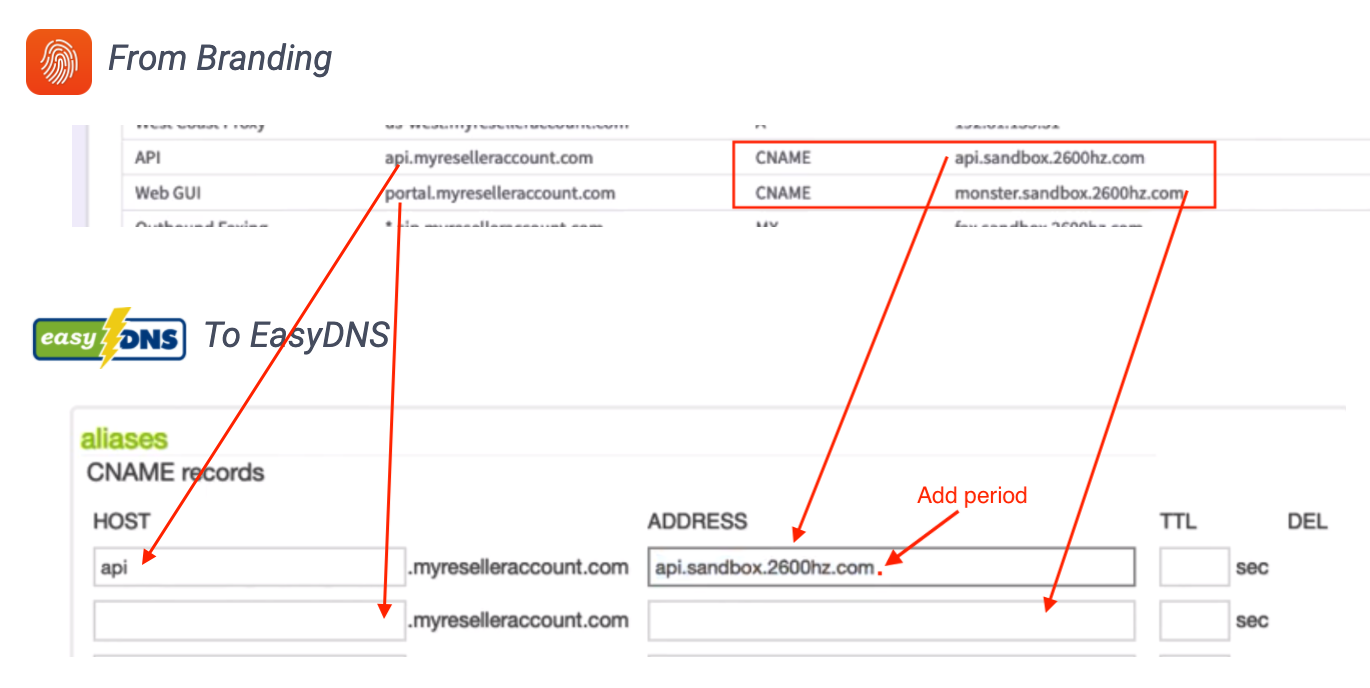
NOTES:
- You MUST add a dot to the end of the CNAME URL (see above). This will indicate that the URL is a fully qualified domain name and does not need to be appended by your domain name (for example .myreseller.com).
- Copy both the API and the WebGUI
- Use 7200 TTL as default to start
Configure “NAPTR Records”
NAPTR refers to the “Name Authority Pointer Record. It is used by your phone to map SIP servers and protocols. You will need to break out the information provided in the Branding app to the specified fields in the easyDNS listing.

NOTES:
- The values in the Branding app are concatenated in a single string. Many applications will provide separate fields for these. See red arrows.
- In the Branding app you will see a set of empty quotes; this is a “null” listing for Regex. Leave that field empty and copy the remaining to the “replacement” field.
Configure “MX Records” for Outbound Faxing MX refers to the “mail exchange” record. This specifies the mail server responsible for accepting email messages on behalf of the domain name.

_From Branding App_

To EasyDNS

Use *.sip, so anything .sip will be forwarded to the fax domain URL.

Configure “SRV Records” SRV refers to the Service Record in the DNS. It is a specification of data in the Domain Name System defining the location, i.e., the hostname and port number, of servers for specified services.
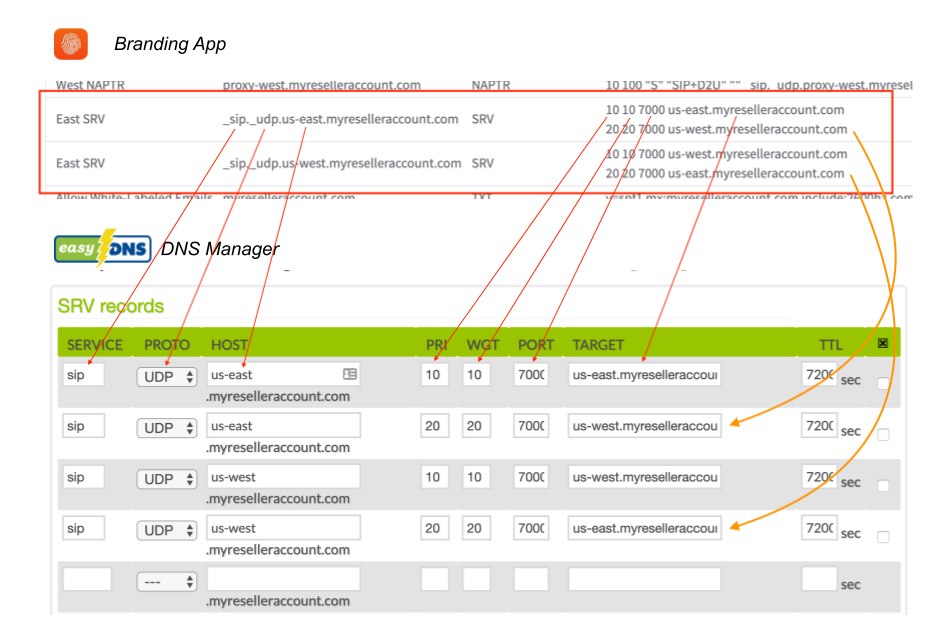
NOTES:
- You must put the “dot” at the end of the Target URL for this record also.
- The values in the Branding app are concatenated in a single string. Many applications will provide separate fields for these. See above red arrows.
- Each SRV value should be added as a separate line. For example the branding app image above shows 2 lines per sip account; you must add these as separate lines, so there should be a total of 4 entries in the easy SRV records list. See above orange arrows.
Configure “TXT Records” (SPF Record) An SPF record is a specifically formatted TXT record. It lists all authorized hostnames / IP addresses that are permitted to send email on behalf of your domain. This will permit Kazoo to send emails such as voicemail notifications under your domain name.
From Branding app:

To EasyDNS

Check for errors! You should now see in the Branding app page the list with all green checkmarks at the right.
ℹ️ You MUST resolve any and all errors for your branded solution to work correctly. If there are still red configuration error notes, go back in and see if you can find the error.
Common mistakes include:
- Not copying the full URL over (missing the last digit for example)
- Unwanted space to the left of your pasted data.
- A missing “dot” at the end of URLs, which causes EasyDNS to append your company URL at the end.
For added redundancy: Copy these records to Amazon Web Services
We recommend you copy all your settings to the Amazon Route 53 for additional redundancy. We have learned over the years that any DNS provider can and will have an outage eventually. This will allow your records to persist even if EasyDNS goes down. Here we will show you how to replicate your records using EasyDNS’s built-in replication feature.
-
First, purchase the Amazon Route 53 integration service from EasyDNS.
-
Then activate and copy your records.
-
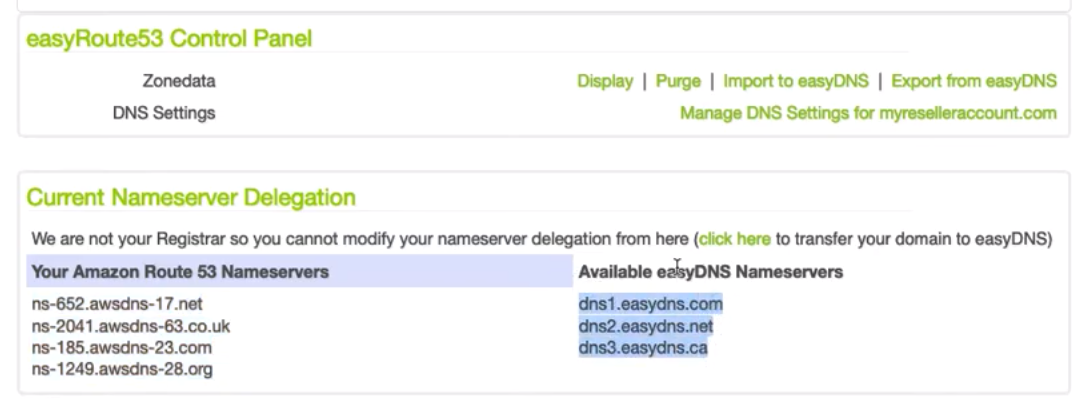
easyDNS will copy all your records and supply you with additional nameservers:


Once confirmed, you should see both nameservers listed.
- Finally, go back to your original Domain Registrar and add the AWS Route 53 nameservers, alternating between the EasyDNS and Route 53 name servers.

SAVE AND TEST! You should now be able to test your new setup.
Frequently Asked Questions
Can I do all this DNS mapping in a single application, e.g. GoDaddy?
While it seems like tedious work to juggle both a registrar (GoDaddy or other) and a DNS web hosting service (easyDNS), we recommend using both. Each is an expert in its field. Domain registrars focus on indexing and protecting your domain name and the most popular have solid reputations for just that. DNS hosting systems are focused on reliably providing the records computers need to enable services to run on your domain name. These also offer different levels of support; we have found easyDNS provides us with all the record types we need (including NAPTR which some do not recognize) and easily creates a redundant occurrence of all settings to Amazon’s Route 53 Web Service. There are likely other systems that offer similar solutions, we are happy to hear what works well for you.
Do all the Lines in the DNS Helper need to show a green checkmark?
Yes, with one possible exception: there may be an instance where the TXT value does not show a green checkmark and the white-labeling redirect processes will still work properly. But you should be well versed in DNS, SPF and mail servers if you have a custom SPF record. If ANY other record does not have a green check mark, it WILL fail.
What are some of the problems that occur if my setup is not correct?
- Your custom UI branding may not display.
- Your phones may not be able to register to make/receive calls.
- Your phones may may not fail over to a secondary cluster if their primary cluster goes down.
- Your customers may not receive their email notifications.
- Your email notifications may go into the SPAM mailbox.
Browser

Set your page title and favicon for the browser version of comm.land, this will ensure the browser version of comm.land is fully branded to your liking.